All Boxed Up

Hello Hello
Welcome to my blog! Today is a good day and I am excited to share with you a project that is now included in my list of most favorites. This is a special type of baby book that I made for a friend of mine, guess what...
one of her really good friends
...had a baby!

A Baby Boy
His name is Mason and from what I hear he is a cutie pie. He happened to be quite early too, he wasn't due until late this month-early next month, but he decided to come in January so I think he surprised everyone. According to my friend though, he is doing extremely well being a preemie.

So this is what I created, it's essentially a baby book in a box. I like officey stuff and files for some reason speak to me when it comes to documentation, so I thought this would be a good jumping off point. I also happen to know a few years back this was a pretty cool idea in the world of altered art/home decor. A company by the name 7 Gypsies came out with a ton of new ideas in this area, which isn't surprising as they have had some incredible vision over the last 10+ years.

In today's scrap world the big names are Tim Holtz and Graphic 45. And there is good reason for this, if you have the time I encourage you to check them both out - I doubt you'd be disappointed, especially if you like vintage anything.

So naturally for this project I decided to go with Graphic 45's Little Darlings collection (unfortunately discontinued) and a little bit of Tim Holtz's idea-ology trinkets including: tissue tape, mini paperclips, a muse token, and then the letter M from his Vintage Market Alphabet Strip (Sizzix Die).

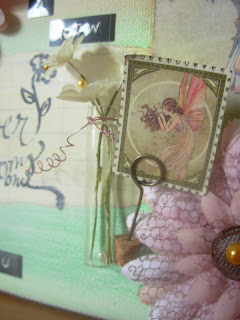
All in all I have one stinkin' adorable baby book in a box. And speaking of box, the one I used was an unfinished wood recipe box type box that I picked up at Hobby Lobby. The first thing I did with the box once I got it home was cover it with a coat of gesso, what this does is allow a clean workable surface for any kind of mixed media, being that I wasn't real sure where I was going with it I figured this would be a wise step. Glad I did too as you'll see later, I did end up adding a layer of metallic glaze. After the gesso dried I then added a few of the larger graphic images from the collection, one to each side of the box-except not the back. Once that was done it still needed some thing more so that's when I added on the tissue tape in random spots, then going a step further I used a postage image that I stamped with black ink over the tape but not over my larger graphic images-as they are the focal points.

Once I got the background of the box finished, I then went back in and started on details. I added in a couple of the paper borders along each side near the top, then went along the front lip of the lid with an ivory crochet trim. I liked that so much I did a second and third running trim around the whole box, one towards the top and one along the bottom. Love how the fabric trim really adds that elegant detail to the whole piece and the neutral color fits perfectly with the baby theme, it's light and soft. Adding in more details I knew that I wanted to use my 'boy' stamp, so I inked it up with embossing ink and then used an antique gold embossing powder, the effect turned out wonderful - I like that 'BOY' becomes a part of the main focal as well as the graphic image. The next detail was the seam binding bow but before I added it on I died it the colors of my paper line to match the whole piece; once it was dry I tied my loopy bow and added it to the front of my box just above the 'BOY'. You'll notice that's also where I added in the Tim Holtz's muse token that says 'geniune'.

Now on the top I added lots of goodies, the most noticeable of course are the flowers ...probably one of my most favorite go-to items (yes even for boy projects), of course I used baby blue so that it would match as well. I also used another one of the graphic images that G45 always includes in their paper collections, this one I backed with a die-cut doily that I cut in half so that you would see the decorative edge on both sides of the graphic image, then I popped the whole piece up with a couple of strips of foam tape. The last little piece is a wax seal that I actually dripped onto a separate piece of paper and then peeled off so that I could add it to my piece here.

Along the back side I didn't do a whole lot, I did do the overall metallic glaze finish like I did with the front once I got all the background pieces in place but other than the crochet trim and my signature card, there isn't anything else I felt that needed to be added, it was done and so completely more amazing than I ever would have thought possible. I am dumbfounded that it turned out so completely...
stunning!
I do hope that you have enjoyed this as well and I thank you for spending a quality amount of time with me so that I could share this with you. If you have any questions you know where to find me...right here.
Thanks again!
just B
.jpg)
Comments