Memory Box with Graphic 45
Hello Hello
Today I have a Graphic 45 piece that I created for a good friend of mine who recently lost someone very dear to her.
Just to give you a bit of back story this friend of mine and I have worked together 10+ years, in the beginning of our work relationship we hit it off really well and became instant friends then as it often goes we kinda lost touch due to schedule changes and life changes but within the last several years we have reconnected and for this I am extremely grateful - she is such a wonderful spirit-always supportive-always encouraging-so I really felt the need/desire to make something extraordinary for her, not only as a moral support in her time of grief but also as a true token of our friendship.
Just to give you a bit of back story this friend of mine and I have worked together 10+ years, in the beginning of our work relationship we hit it off really well and became instant friends then as it often goes we kinda lost touch due to schedule changes and life changes but within the last several years we have reconnected and for this I am extremely grateful - she is such a wonderful spirit-always supportive-always encouraging-so I really felt the need/desire to make something extraordinary for her, not only as a moral support in her time of grief but also as a true token of our friendship.
My first inspiration for this piece came from wanting to console her. I wasn't clear on what exactly I wanted to create but slowly the ideas started coming to mind:
meaningful first and foremost
then interactive
and finally decorative.
The second place I found inspiration was from Graphic 45here, not only is this company absolutely on top of their game, they have the best design team around today. Now I wish I could give you the link to the project that I was inspired by but I have looked everywhere and I apologize because I could not find it so just bare with me, it was most definitely from one of their designers and I think I found it through a link in one of their emails so if/when I do find it I will update this post as well as my YouTube video post.

So what I started with is Graphic 45's ATC Book Boxthis from their staples collection and also Graphic 45's A Ladies Diary paper collectionthis now I know that the book box is still available but the Ladies Diary has been retired so you might check Ebay or Amazon if you're interested. The reason I chose this collection is because I wanted the final piece to be something elegant yet nostalgic, plus it fit perfectly for the situation at hand or so I thought.

 Starting with the back of the piece, I fussy cut a very large image from the paper collection keeping with it the title: A Ladies Diary then backed it with black card stock so that it would stand out against the background paper. From the photo above you can see where that paper doily hangs down giving the back side a more elegant look. Also I added in a few extra embellishments; the die cut lace frame with the date banners and then at the top I added a couple of stamps that I punched out from the paper collection and then added the paper border strip along with a crochet lace trim. After getting all the paper pieces attached I thought that the title piece hanging off to the left side looked a bit bare even with the black card stock behind it so I added the backing piece to help it stand out a bit more on it's own...which is another reason why Graphic 45 rocks, all of their papers are double sided.
 In the photo above you can somewhat see that paper doily that I mentioned earlier and although it does get a bit lost in all the other embellishments I find that with out it I'm afraid it'd be noticeable how 'empty' that space would look. So keep that in mind when working on decor pieces, it's okay to add layers and for those to get covered up, it's better than having nothing. In the end it all adds up to texture and well...interest so I say, 'go for it'.
 Now in this photo you can see some of the details a lot better, I added in quite a bit but I also selected my pieces very carefully, you don't want to over-do it because then it would just appear...thrown together and that's not good - not with this type of home decor. The first pieces I had pulled out and ready to include were the wooden clothes pin and the wooden spool and unbeknownst to me at that time these two pieces became a very significant duo within the piece. I also added in several flowers and a couple of charms.
 On the right hand side you can see that I included a pen nib and a muse token both from Tim Holtz's Ideology linehere, plus a metal camera charm and a couple of butterfly motifs.

 Now as for the main portion of this memory box I created spaces for lots of stories and/or tidbits to be recorded. My vision was that when my friend thinks about this loved one she can write it down within these spaces - maybe a funny story that happened with just the two of them or a favorite line that her loved one always said, could be that she knows what her loved one's favorite songs were or favorite books were, that can all be written down here.
The bulk of it lies within the 6 large tags that I used from Graphic 45's staple line as well. Creating each tag using paper from A Ladies Diary and several from Prima's Ledger line there is plenty of room to journal just whatever comes to mind.

 Also with the 6 large tags I included the 3 smaller tags that actually come in the ATC Book Box, these I use more as a decorative element throughout but there is a tiny amount of space for a smaller amount of information, maybe a favorite line from a movie or lyric from a song. Then within A Ladies Diary I found the 3 little journal spots each having their own little word already printed on them - I thought it to be more than mere coincidence so I added them to my 3 smaller tags, just like it was meant to be.
 Now on the flip side of these smaller tags I added a quote to each that I thought fitting...
hopefully she does as well.
Also in the photo above you have a close up of the mini journal that I made to tuck into that pocket on the large tags; they are each 4 pages and all stamped double sided with journaling lines, then hand stitched together.
 So here is the final piece with all of the tags taken out, I left the inside of the box plain because I figured that it's more likely for her to pull one tag out at a time so there was really no need to do anything inside the box. Now I mentioned earlier that the clothes pin and the spool ended up playing an important roll in this piece, well if you watch the video below you'll know what I'm talking about.
Hope you've enjoyed this project and I hope that you're inspired to do something creative today.
Thanks!
just B
So the first few steps I did was to create my platform using a wood pillar piece and a 4 x 6 flat wood panel and in doing so I decided to go with black as my background color once I had them glued together. After the gesso dried I added on a paper doily to the top of the wood platform and hung it off the back just a bit to add more texture and more interest when looking at the piece from all sides; plus even with the box adhered in place on the platform you could still see the lace edge peeking out from under it which is exactly what I was going for. Now in order for the box to be ready for this step I first had to mat paper on the front and back sides of the lid, in essence keeping it permanently open...why you ask?... well that's because I needed the lid to act as a back instead of a lid so I stood it open and made it stay open using paper, then I glued the box to it's 'back'. Once the glue set up I moved on to getting the all the details done.


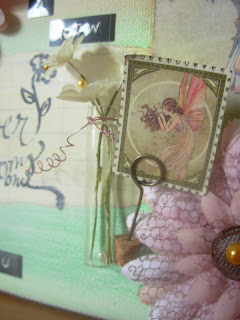
On the left hand side I added a heart shaped charm that says love, a pearl straight pen that I tucked up underneath the flowers so as not to poke anyone, and then a couple of small black snaps which were added because they were black in color and they kinda went with the 'sewing' theme that I had going on the front even though that wasn't the main direction I was going in. My over all goal was to make it 'feminine' and I certainly think I achieved that.

The bulk of it lies within the 6 large tags that I used from Graphic 45's staple line as well. Creating each tag using paper from A Ladies Diary and several from Prima's Ledger line there is plenty of room to journal just whatever comes to mind.
In the photo above you'll see the basic make up of each large tag, on the left is one side and then on the right is the opposite side. On the left you'll notice that there is a pocket and in it is a pull out - that is a mini journal, so with 6 tags that's 6 mini journals. On the right you'll see two journal spots, they are double sided with writing lines and then I added the photo tuck at the bottom of each tag on this side because I found since they stand up, when I pulled them out of the box the journal spot had a tendency to fall out.

hopefully she does as well.
Also in the photo above you have a close up of the mini journal that I made to tuck into that pocket on the large tags; they are each 4 pages and all stamped double sided with journaling lines, then hand stitched together.

Hope you've enjoyed this project and I hope that you're inspired to do something creative today.
Thanks!
just B
***PS***
I found it...
the inspiration piece...
Thank You Annette!
.jpg)
Comments