Mixed Media Waterfall Album
Hello Hello
What's up? Hope all of you are having a fantastic work week. Here on the home front, my oldest daughter is back to health and I got back to work earlier this week; plus recently I have been contemplating some unfinished projects and pieces on my very long 'to do'...or rather 'over due' list. It's time I really ought to decide if some of those unfinished pieces/projects should just get canned or if I should actually finish them, especially before I start anything else new.
But of course...
have I decided any of that?
nope...
the one thing most on my mind that I am really trying hard not to think about to much is...
But of course...
have I decided any of that?
nope...
the one thing most on my mind that I am really trying hard not to think about to much is...
Vacation...
a for real one where we actually go somewhere else and do what we want to do...lol
and what's even better...I get to introduce our girls to the Pacific ...they've never seen the ocean and I can't wait to see each of their reactions. My soul's essence was born of water and to share this fundamental part of me with them is a milestone for me on an emotional level, probably not something they will understand until they are older if even then and probably nothing I would ever be able to explain with words. Anyhow...
who's ready for the beach?
who's ready for the beach?

Lucky for you I have just the thing...
This is a waterfall style album that I created. On the cover I did some mixed media techniques that I will share with you in a moment and then on the inside I did a pocket with tags and a double spread of waterfall style pages.
This is a waterfall style album that I created. On the cover I did some mixed media techniques that I will share with you in a moment and then on the inside I did a pocket with tags and a double spread of waterfall style pages.

For the cover:
first of all I bound this book differently than I normally do, I still used a medium weight chipboard but instead of covering it with a pattern paper I covered only the front with canvas which ended up giving me the perfect surface to work the mixed media on. Then on the inside covers where I would normally add another piece of pattern paper, the pocket and the two waterfall pieces dub as the cover piece so I actually saved myself a step this way.
first of all I bound this book differently than I normally do, I still used a medium weight chipboard but instead of covering it with a pattern paper I covered only the front with canvas which ended up giving me the perfect surface to work the mixed media on. Then on the inside covers where I would normally add another piece of pattern paper, the pocket and the two waterfall pieces dub as the cover piece so I actually saved myself a step this way.

Starting out with the mixed media, my first step was to gesso the entire cover, next I added on the lace with some gel medium then moved on to the stenciling once everything was dry. I waited a bit longer then added on some color with the idea of sky and water in mind, once I was happy with that I added on the fishing net using a heavy gesso, then just because I could I added on the sand while the gesso was still drying and you know what...it looks awesome!

It wasn't until after I finished the entire cover that I realized I had no way to close the book...damn!
So I improvised...I punched a hole in each of the finished covers, on the left side I used a hair tie that I looped through an eyelet which then catches the hitch post that I added to the right hand cover. So far so good but I am worried if it will hold once all the photos are added in...but I'll jump off that bridge when I get to it...lol
So I improvised...I punched a hole in each of the finished covers, on the left side I used a hair tie that I looped through an eyelet which then catches the hitch post that I added to the right hand cover. So far so good but I am worried if it will hold once all the photos are added in...but I'll jump off that bridge when I get to it...lol

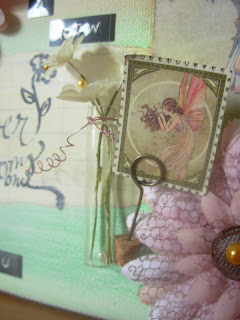
Here is a closer look at all the texture - do you see the lace at all, it's so subtle and I think that is what I love the most, then towards the top you'll notice the stenciling, then finally the most obvious - the net with the sand bunched up within it.
Fantastic - I really had no intentions of this becoming an actual piece, my fear was that I would end up with just a huge mess...so glad I didn't let that stop me from trying.
Fantastic - I really had no intentions of this becoming an actual piece, my fear was that I would end up with just a huge mess...so glad I didn't let that stop me from trying.

For the inside:
So the first flip out opens to the left and this is where I included an expandable pocket, being that it is expandable I decided to use the string closure so that it would be able to accommodate any extra bulk and still be able to close correctly. This pocket is where the journaling goes, I made several tags that fit into it and they are each double sided with one side being a large photo from the paper line and the other side being journal lines that I created on my computer.
So the first flip out opens to the left and this is where I included an expandable pocket, being that it is expandable I decided to use the string closure so that it would be able to accommodate any extra bulk and still be able to close correctly. This pocket is where the journaling goes, I made several tags that fit into it and they are each double sided with one side being a large photo from the paper line and the other side being journal lines that I created on my computer.

The next flip out brings us to the main double spread waterfall pages. Before I started this project I asked my friend several questions: How many photos do you normally print, what size of photos do you want and what orientation do you usually prefer? It's a good thing I asked because a lot of people still don't understand what 'orientation' means photographically speaking ...all I was asking her was is if her photos are tall and skinny or short and fat when they are in a photo album...do her printed photos look right at 4 inches in width and 6 inches in height or the other way around. A 4 x 6 is typically considered 'Portrait' style so therefore a 6 x 4 is a 'Landscape' style.
Hopefully all that was clear as mud...lol
Anyways her preference happens to be landscape style and so what I did is I made my waterfall pages large enough to orient them in a landscape fashion {6 x 4} also I made sure to have enough spots to accommodate the amount that she normally has printed {36} and then finally to have them all matted with a half inch border all the way around which actually makes the pages 7 x 5
Let me tell ya...this sounds crazy having spelled it all out like this...but really it wasn't difficult in the least once I had all my measurements down.
Let me show you what I mean.

So in the photo above you get an idea of the way I oriented the pages and why the 'waterfall' style was the best way to approach this particular project. I was able to get 36 photo spots in this whole thing, she asked for somewhere between 30-40, so by making a waterfall style not only do I have photo mats on the front/tops of the pages - when they're flipped up I have a photo mat on the back/bottom of that same page giving us more bang for our buck and then what with that pocket on the far left to document the adventure...it makes a pretty sweet little album with all the important bits and pieces tucked inside it.

I'm gonna have to back up a minute - go back to that initial question/answer thing that I did with my friend about the photos...yeah...I also asked if there ought to be a theme...
'the beach'...
that was the response I got so the two paper packs that I used are by Paper House - one called at the beach and the other is Nautical I believe. In fact the two pieces that are in the place of photos at the top of each waterfall, are actually 6 x 4 cut outs from the pack.
'the beach'...
that was the response I got so the two paper packs that I used are by Paper House - one called at the beach and the other is Nautical I believe. In fact the two pieces that are in the place of photos at the top of each waterfall, are actually 6 x 4 cut outs from the pack.

Now finally we are getting to the end...this is the final element that I added in at the end of it all. I got to thinking, sometimes that happens to be a good thing, and decided that with this many photos there wasn't going to be enough journal spots to document it properly so I added these two ephemera pockets at the end of both waterfalls to catch any of the remaining bits and pieces from their adventure. So receipts, clothing tags, ticket stubs, photo booth pics, postcards they happen to grab along the way...all of those little extras can fit into these pockets, fancy that!

So there you have it...
Whose ready for the beach?
besides me me me me me...lol
thanks for taking a look
hope you have a wonderful weekend ahead
color your world and live creative
just B
.jpg)
Comments