J is for Justice

Hello Hello
How are you doing this fine day? Fabulous I hope.
Me, myself, and I are trying to get caught up on some things that have taken a back seat for far to long but now that summer has officially begun hopefully I can get back to where I left off.
 So before I jump into anything to crazy I did want to share with you this second altered letter that I did for my youngest daughter several years ago for Easter. For hers I used a softer color palette because she has a quieter disposition than her older sister.
How are you doing this fine day? Fabulous I hope.
Me, myself, and I are trying to get caught up on some things that have taken a back seat for far to long but now that summer has officially begun hopefully I can get back to where I left off.


So the paper collection I used I have no doubt is retired but it's by Die Cuts With a View and the name is The Linen Closet, probably one of my favorite lines as far as color goes. I did another project with this line several years ago that is still one of my favorites to date and I am hoping later this year to compliment each of my daughter's altered letters with a name banner using the same paper lines that I did for each of their first initials.

For this letter, as I did with the letter L, I started out using a dark colored acrylic paint first on the back and both sides then covered that with a coat of crackle medium; once that dried completely I covered that layer with an acrylic paint in a cream color - one that matches the base color of my paper collection. Afterwards I set out to 'quilt' my pattern paper to the letter J
Really all that means is that I rough cut some squares and then deciphered where they would go, once I had all my blocks cut out and mapped out I adhered them to the letter. For the stitching of my 'quilt' pieces I used a cream colored ribbon and at each joint where paper edges met, I covered it with a piece of the ribbon, adhering it with a double sided tape.

Now for the outside edges I needed something more than just the ribbon, the ribbon worked awesome on the joints inside but I needed something with a little bit more UMPH...to finish off the outer edges so I rummaged through my stash and found a beaded pearl strand and lucky for me it just so happened to match the entire piece so I grabbed my hot glue gun and very patiently glued it onto the outside edge of my piece, and I have to tell ya, it looks superb!

Once I had all my pieces stitched and the finished edge glued on, I gathered up some embellishments and played around with those for a bit deciding again where everything would go. As with the letter L that I did for my older daughter, this piece is also quite large and so I decided to do several embellished spots of interest just to keep the eye moving. Not sure what the design principles are nor whether or not I achieved any of them but at the time I did not care about that and quite honestly I still don't. For me this piece 'works' and that is what I care about.

As you'll notice I have two main spots and then several single pieces throughout. My first spot is the bottom left corner or rather halfway into the first curve of the letter where I included a large inked cream paper rose with a few smaller roses snuggle in next to it, added in a couple of silk leaves and then a Muse Token that says Journey.

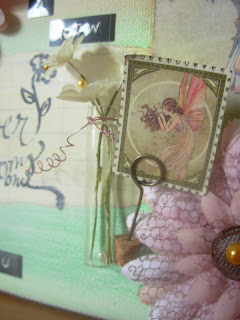
Then as we move along the bottom of the letter along the right side coming out of the second curve is where I added in my second embellishment spot. Again I have a bunch of paper and silk flowers all gathered together nicely with a few that are inked up just slightly. Within this bunch I also include a Memo Pin in which I added a journal spot that says what I wanted to convey to my daughter...
I love you
you make my heart smile
 Now from this point on there are only single bits here and there. I used mostly paper flowers - some roses and cherry blossoms that I ordered a few months back from Wild Orchid Crafts, I kept them in the cream color scheme because I didn't want them to distract from the 'quilted' look and also because my one bit of color I had already added to the opposite side to act as a leader. To finish off the piece I included one more embellishment in the top right hand corner of the letter - the cream colored butterfly - because I love how she just fits right there.

you make my heart smile


So there you have it, hopefully my pictures do it justice and you can grasp the full effect, it really is beautiful in how it turned out. Hope you like and if you have any questions feel free to ask. Thanks for stopping in and I hope you have a great weekend...
TGIF!!!

just B
.jpg)
Comments