Birthday Blessings

Is it the weekend over already? Oh my....well hopefully everyone had a ball. Today I want to share with everyone this little cutie that I made for a friend of mine. Her birthday was last month and I wanted to make something for her (I owed her that) but instead of making her just a simple birthday card, I decided to try out this idea that I've had for awhile, so this is the mini book I came up with. My inspiration came from Arlene over @ Butterfly Kisses from a mini here that she did. I thought @ the time that the mini was really a 'mini', turns out that hers is like 6x12 - where as mine here really is a mini, it's maybe 3x4.5 if that. So when I realized this and knew that there wasn't going to be much room for anything of their own, I decided it would make a great birthday mini.

All in all I think that this one is my new favorite: it is cute, it is teeny tiny, and it has lots & lots of character. Of course the paper collection I used has been a long time favorite (here), I've used this same collection for several projects. You can bet that when my friend told me what her favorite colors were, I got excited because I knew that this was going to be the perfect stack to use.

Here is a top view, as you can see it is thick and full, full, full

Here's a look at the opening page

So on the left side I put a little note to my friend for her special day and then added a couple of butterflies and a flourish with a little ivory rose.

On the right side I added a couple of ephemera pieces: ticket stubs, and some tissue tape, her age (but don't tell her that I told you) and then a little jab about getting older. (heehee)

Here's a look at the next page, love this - that when you open it up you see the whole butterfly!

So on the left side, I have a hidden pocket that I put behind the circle flourish and in it I added a couple of journaling tags: one says, "Happy Birthday", one says, "Make a Wish", then on the back of it, it says, "Wish Big".

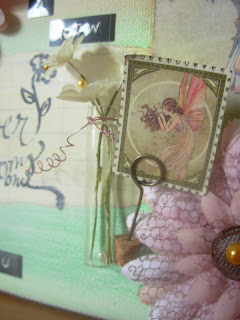
On the right side here I have a stamped image where I wrote her name, then I also added a couple of ephemera pieces: one is a vintage label & then a couple of stamps. I also added her first name initial and a rose to top it off.

Here is one of the tags that is hiding in that pocket.

Here is the next page

So on the left side I kept it simple, I added her sign in a little word strip. Then I added in some roses, with a little pearl flourish & bling.

On the right side I used a journal spot and wrote in it some other famous Virgos, thought that would be interesting and fun.

Here is the next to the last page

On the left side I used a flourish frame and added on a calendar spinner, pointing it of course to her birthday month, then added a cute little punched out center to the spinner.

On the right side here I have a vintage label, an arrow pointing to the sign that says, "Happy Birthday"

The last page

On the left side here I added in some paper ephemera; there's another arrow pointing @ the ticket stub, then I also have a stamped image that I punched out, a couple more blank tickets, and then a butterfly with some pearl bling added to her for the body.

On the right side here, which also happens to be the last page, I used another large flourish, a butterfly with the pearl bling body, a couple of the roses, and then another journal spot that I signed like I do with all of the things I make.

The final outcome: One cute little teeny tiny mini that I absolutely adore and having two little girls, I might be making a few for around here in the next couple of years.

Well I hope all of you have enjoyed my crafty mini, I have lots more on the way to share with you so stop by again soon, and Thanks! Feel free as always to leave me a comment, I would appreciate your time, thoughts, and feed back.

just B.......free
.jpg)
Comments