LIFE - unscripted

Okay peeps, I have another mini to share with you today. I did this one awhile ago for my youngest daughter, I didn't think it was fair that she still didn't have as many as my oldest, but honestly I don't know that she ever will. You know what they say is true, you're never quite as on top of things with your second as you are with your first.......in my case I don't think I was ever on top of anything, with either, and if I wasn't then...I sure as heck ain't now. = )
But anyways - here's another of her minis, hope you like!
But anyways - here's another of her minis, hope you like!

So here you have it. I used a mini album idea that I had found on Lizzy's site (forgive me for not finding the actual link to the tutorial-I searched and couldn't find it) a long time ago and I have actually made this particular mini 3 times now. I will continue to try and find the direct link because this mini is so doable and I like doable, it makes it super simple.

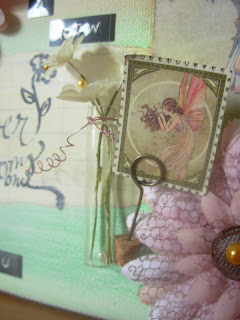
So on the first page I have a photo that I sized to 2x2 and then added some stamped embellishments. My favorite though is the Tim Holtz film strip ribbon here, added in among all the photo phrases that I stamped in black archival ink and then cut out, just perfect.

Across from that I used my Sizzix square envelop die here to make a pocket so that I could add a little tiny journaling spot, then used my bracket punch to make the pull out handle for the spot. On it I stamped a sentiment about little girls and then added a cute little girly brad at the top of the pull to add 'bling'- that and I tend to like lots of stuff in my minis. On the front of the pocket I stamped the letters & the journal tag and cut them out and added them on also.

Here's a close up of the journaling spot with the bracket punched piece as the 'pull'

For the next pages I used several punches, couple of stamps that I stamped in black archival ink and then cut out, and used some ribbons & metal pieces to top it all off.

On this side I have the ticket punch that I staggered in a stair step pattern, then added a crochet lace and a stamped ticket image. The black ribbon tops off the lace and then in the back I added a butterfly stick pin that I added some seed beads too and the metal brad that sums it all up with one little 'powerful' word...love. I did alcohol ink the butterfly with copper here so that it would match my papers better, it's original red just didn't mesh very well.

On this side I have another 2x2 photo, a tag punch, a stamped image, a paper heart punch, and a metal keyhole with a metal key brad. As for the key brad I just cut off the little metal prongs on the back of it so that I could hang it as a charm from the keyhole. And the little pink paper heart, I pierced a single hole in it - then ran a piece of baker's twine through the hole - around the key - back through the hole - and then tied it in a knot in the front. I really like how it turned out.

For the next set of pages, I have much of the same: a 2x2 photo, stamped images, crochet lace, couple of punches, and a couple of metal pieces. Love, love, love metal with lace - not sure why - but I do.

Oh goodness - sorry about the lighting in this photo - not sure what happened here. But as for the page, I have a 2x2 photo of my baby, a stamped image that says so, an arrow punch pointing to her, a crochet lace along the side with a metal button brad to top it off. You might have noticed that all my photos have a mat, it's just a square punch that's a little bit bigger than the one I used to punch out the photos and then on the photos, I used a small hole punch to cut out the corners of my photos. I do this a lot so I guess I like how it makes them look.

Here is the opposite page, it has several stamped images that I cut out and distressed. Once I had them roughed up I inked the edges and them added them on; the 7 gypsies paper clip this is only there for decorating purposes - that & I love 7G. The crochet lace down the side topped with a punched arrow pointing you to the warning label was intentional.....love that!

Almost done, this is the second to the last set of pages

Love this picture of her little piggies - no doubt that'll be a favorite of mine for a very long time. Along with the picture I added a journal tag with another 7G's mini clip, a pair of metal feet I think from Making Memories years ago, a stamped image that I did twice & cut out along with another stamped image that I punched out with a circle punch then turned into a charm and hung from the previous stamped piece. I like it, a lot, wasn't sure how well a paper charm would hold up but so far so good - of course this mini is only 6 months old if that, so...........we'll see.

On this side I had to add the photos where she was grabbing her piggies, love it too. Then because she was using her hands I thought it would be appropriate to also add in the metal hands by Making Memories. The stamped sentiment over lapping the red ribbon & metal slide were just add ons to give the page some extra 'umph' - is that a word?

Okay last one... You'll see some familiar things once again. I think this is probably one of the few minis I've done that have kept a consistent theme throughout the whole of the book, and well.....I love it - might have to start doing this more often, it keeps a good flow.

Here you'll see that envelop pocket that I used earlier in the mini, along with another tiny journaling spot with the bracket punch dubbing as it's 'pull'. The difference on this one is that I used a metal filigree then added on the clear heart bead to make a hanging charm. Love it! I also for this page added a double layer of ribbon, one is the crochet lace under the pocket and then the other is the twill with the printed sentiment on top of the pocket....all in all very cool.

For the last page, I had to get some more of the film strip ribbon in and this is where I actually figured out that twisting it worked magic, so I then redid the first page to match. To keep the film in place was a bit more challenging which is where the tiny attacher this came in handy. To finish off the page I added a stamped image and the metal word, again another Making Memories piece from years ago.

Here's the close up to the journal spot on the opposite page, again another stamped image with a girl sentiment. Love the hanging charm even more every time I see it.

The back of the book and you'll see the gaffer's here tape along the spine, that's what ultimately holds the book together, love my 7 Gypsies stuff; then also one final punch that I used to sign my name on.

A bird's eye view

Here's what it looks like, not very big at all, in fact I think it's 4x4. On the cover I have lots & lots going on. For starters I have in the very, very back a Tim Holtz regal crest die this in pink, on top of it a added a white piece of fiber to soften it up, then on top of that I stamped the image 'LIFE' - cut it out - distressed it - inked it - and then popped it up on pop dots to give it some dimension and added it. Along the bottom I added another stamped image that I cut out, then used a couple of felt flower brads that I inked up to tone down so that they would match a whole lot better. The other pieces you see are a mini clip this from Stampin Up that my girlfriend was so kind to order for me a long time ago, followed by a Tim Holtz muse token this to sum it all up. The black crochet lace down the left side that you can hardly see was added more just to break up the transition there between the gaffer's tape the pattern paper.
Well that's it, hope you enjoyed checking out my latest post, feel free to leave me a comment any time and please drop in again soon. Have a great day!
just B...... unscripted
Well that's it, hope you enjoyed checking out my latest post, feel free to leave me a comment any time and please drop in again soon. Have a great day!
just B...... unscripted
.jpg)
Comments