Grads Rule
Good Morning Everyone!
Hope everyone is enjoying their week. I am in the middle of packing up our house because this weekend we will be moving. So excited but it's kinda surreal, I have never bought a house before so this waiting period, although I understand is necessary, it is also torture in the only way that torture can be good.
: ) LOL
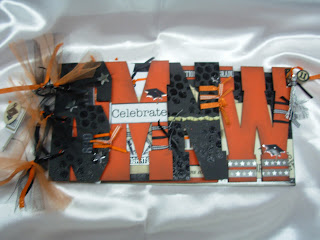
So being that about half of my scrap supplies are already packed, I decided to share with you one of my Design Team projects. In the wake of doing Graduation Cards, Carolyn thought that I was on a roll and wanted me to continue in that direction, so in the spirit of 2011 Graduates, I give you a Graduation Mini Album. This album represents Shawnee Mission North West High School, which is the area HS closest to The Scrapbook Page here, located in Shawnee Mission, Kansas.
Although I am far removed from high school and the colors couldn't be further from what my HS colors were; I gave it my best shot and this is what I came up with. Now before we go any further I will admit that the chip board letters and all the card stock to match the letters, were die cut for me. The only thing that I had to do was adhere the die cut pieces to the chipboard letters.
That and of course make it look pretty!!!
That and of course make it look pretty!!!

So to start off I decided that the card stock was just too plain, so for the orange pages I distressed the edges with vintage photo here, and then for the black pages I had to get a bit more creative. I took a piece of bubble wrap and inked it with clear embossing ink here and then stamped it all over each of the pages, then I used clear embossing powder here, heated it up, and voi·là. The shiny dots against the flat black adds depth without taking away from the integrity of the color.
Here is a close up of what the distress looks like on the orange card stock and then the black page behind it (not a good close up but you get the idea). Also in this photo you see the mini banker's clip that I embellished and then clipped to the W. The silver tassel is one that I made myself using silver cording that I unraveled, then I cut several 5" lengths, folded them in half, then added a thin piece of striped ribbon to hold it all together, attached a jump ring and hung it off the clip. It's rather cool I think.
Here is the front cover, the clear embossing technique is obvious in this photo, giving you a very good idea of how much it added to the textured card stock. I decided to keep this front page pretty simple only for the fact that it will be the one that is most exposed to everyday elements and trust me it is very frustrating when all the little details that you've taken the time to make continue to fall off or just disappear altogether. Now granted on this type of book, there is not just one front cover that you have to worry about there are several so as you scroll down you may notice that most of my 'covers' don't have a whole lot on them.
Here is the front cover, the clear embossing technique is obvious in this photo, giving you a very good idea of how much it added to the textured card stock. I decided to keep this front page pretty simple only for the fact that it will be the one that is most exposed to everyday elements and trust me it is very frustrating when all the little details that you've taken the time to make continue to fall off or just disappear altogether. Now granted on this type of book, there is not just one front cover that you have to worry about there are several so as you scroll down you may notice that most of my 'covers' don't have a whole lot on them.
Looking @ this photo you're probably thinking, "Ok.....did I miss something?" No you didn't miss a thing, I left this page plain as well because as small as the letter S is, there wasn't really a whole lot of room to do anything noticeable. And @ this point I am still working on drawing you in, so in this case less-is-more.
Here I did step it up a bit, added a few stickers, one in which I popped up with pop dots here. Then I used a couple strips of ribbon underneath the popped up sticker.
On the back side of the letter M, I added one of the paper borders except I cut it down to fit on the page.
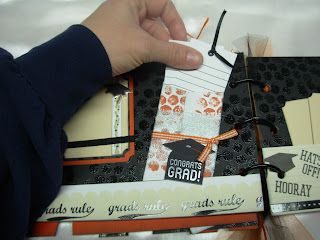
On the opposite page I added the 1st interactive element, a coin envelope that holds 2 journaling tags. Over the years that is the one complaint I had with mini books, there was never any room to even jot down a few thoughts so in this Grad book I wanted to make sure that there were plenty of places to write thoughts.
Because the supplies I was given to work with were limited, I used my Tim Holtz design ruler here and my black Sharpie Pen here to draw the lines on.
The back of page N, I did a matted postcard and stuck 2 more journaling cards in it.
Had to get the 2011 in there a few times!!!
For the front of the W I had quite a bit more room to work with so I added in 2 more interactive journaling spots, or for that matter photo mats.
I suppose if it were my book I would have a photo on the blank side and then have whomever the picture was of write a message on the back, like a photo/autograph book.
On the bottom of each pocket I used a piece of the pattern paper, punched a couple of holes in the design, weaved some ribbon through it and then added it to the top of the black card stock piece using pop dots to give it some dimension and to make the pocket for the journaling cards.
On the back side of the W I did another journaling mat (or it could be for a photo or even a favorite quote) and another coin envelope to add a few more spots for journaling; topped off the page with a few stickers and several ribbons.
Here another look @ the journaling
The mat has a ribbon that goes over the top of it so in case you have several quotes or photos or whatever they will all tuck together into it and it will stay in place.
On the last page I made 9 wallet sized photo mats for friends senior pictures. Obviously if you have more than 9 pictures, you could either do pictures on both sides or add however many more mats you may need.
The mats are just card stock and I inked the edges in black soot here to define them a bit more. Inset the corners and called it good.
The back cover of course signed by yours truly. : )
Another look @ the front of the mini
Here is close up of the mini banker's clip that I clipped on the side of the W
On the spine of the mini I made 3 little double sided tag charms and attached them with jump rings
The opposite side of the charms, the middle one could even be used for another short quote or maybe the name of the graduating senior who is keeping the album.
So there you have it, my 2nd Design Team Project. I had fun with this one but I love minis so that is no surprise. I will say though that it was still a challenge because as I mentioned early I am not given a lot of product to work with mostly pattern paper(s), card stock, ribbon(s), stickers, and a couple of odds & ins. Of course most would tell you and I would have to agree this is when your 'creative' side truly shines, when you let your imagination take over to solve whatever problems arise.... and that really is what it is all about for me..... the creative imagination!!!
So have a wonderful week, enjoy the wonderful weather nature has bestowed upon us and just b......
creative


.jpg)
Comments